Masternode Setup
Please make sure to backup public AND private keys from the console with "dumpprivkey ACCOUNT"
Funds preparation (Wallet side)
Download the Titanium-Qt wallet
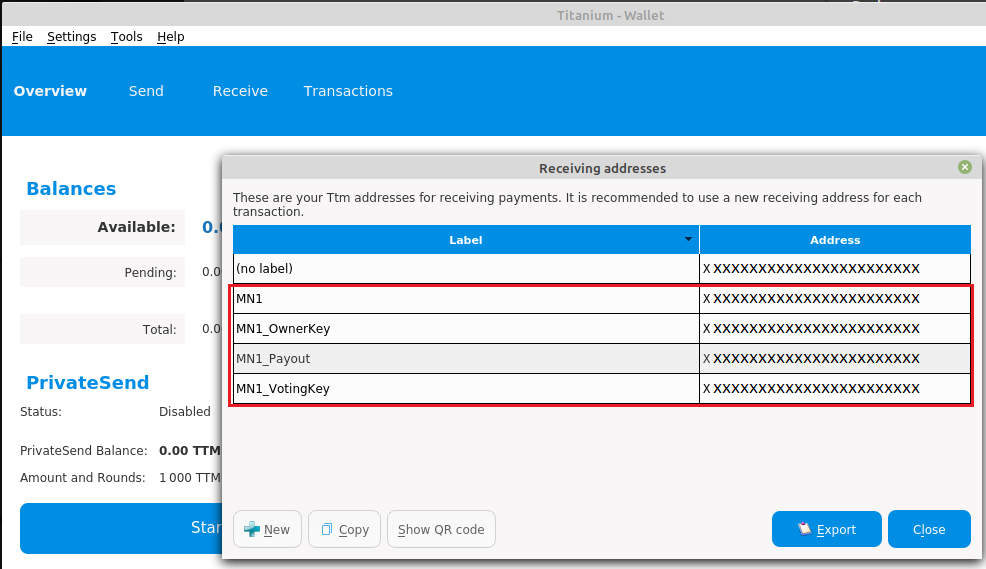
We need to create 4 addresses
- Collateral address
- OwnerKey
- Payout address
- VotingKey
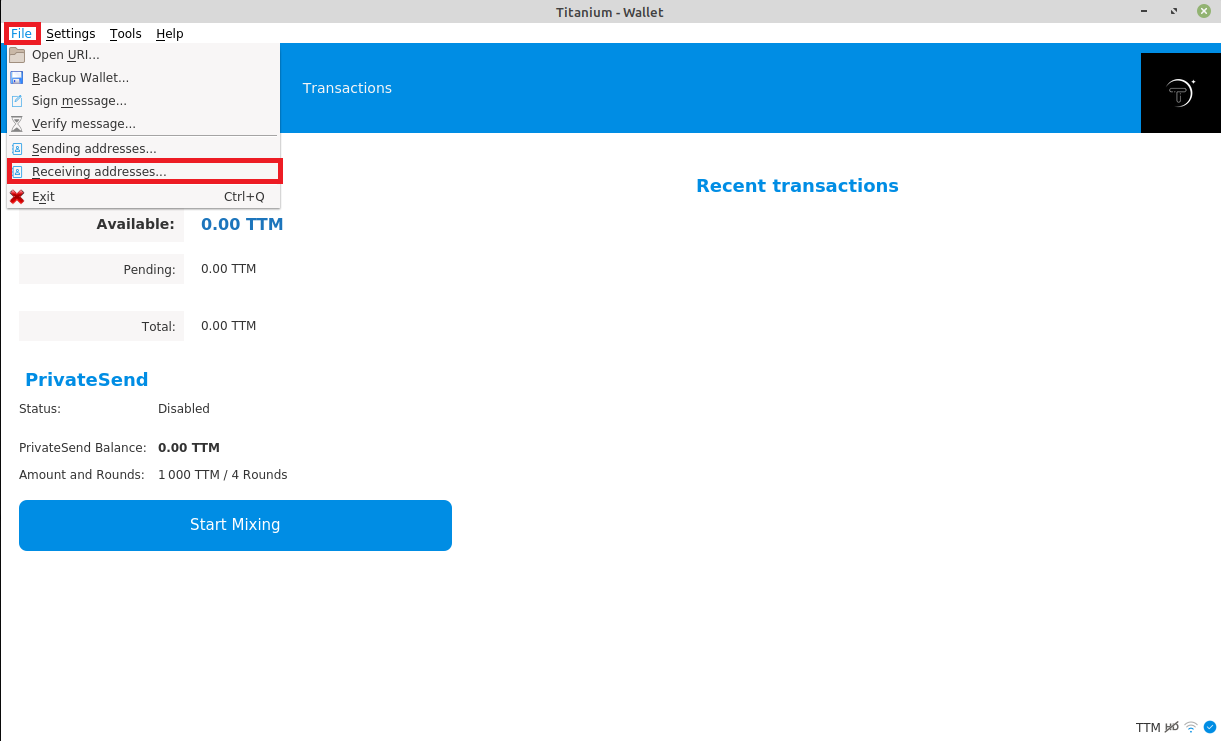
1. Open your QT wallet and open File -> Receiving addresses.
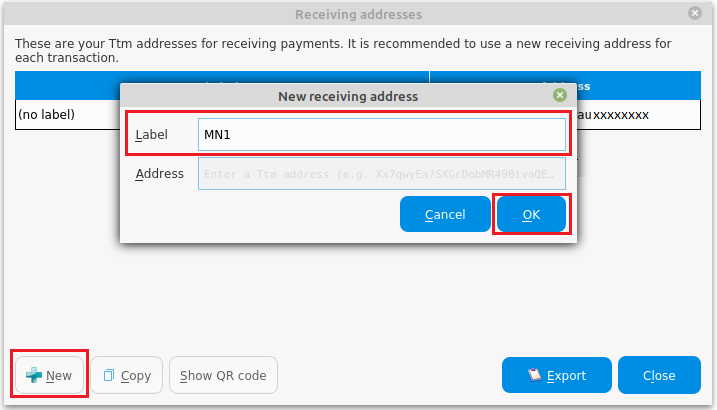
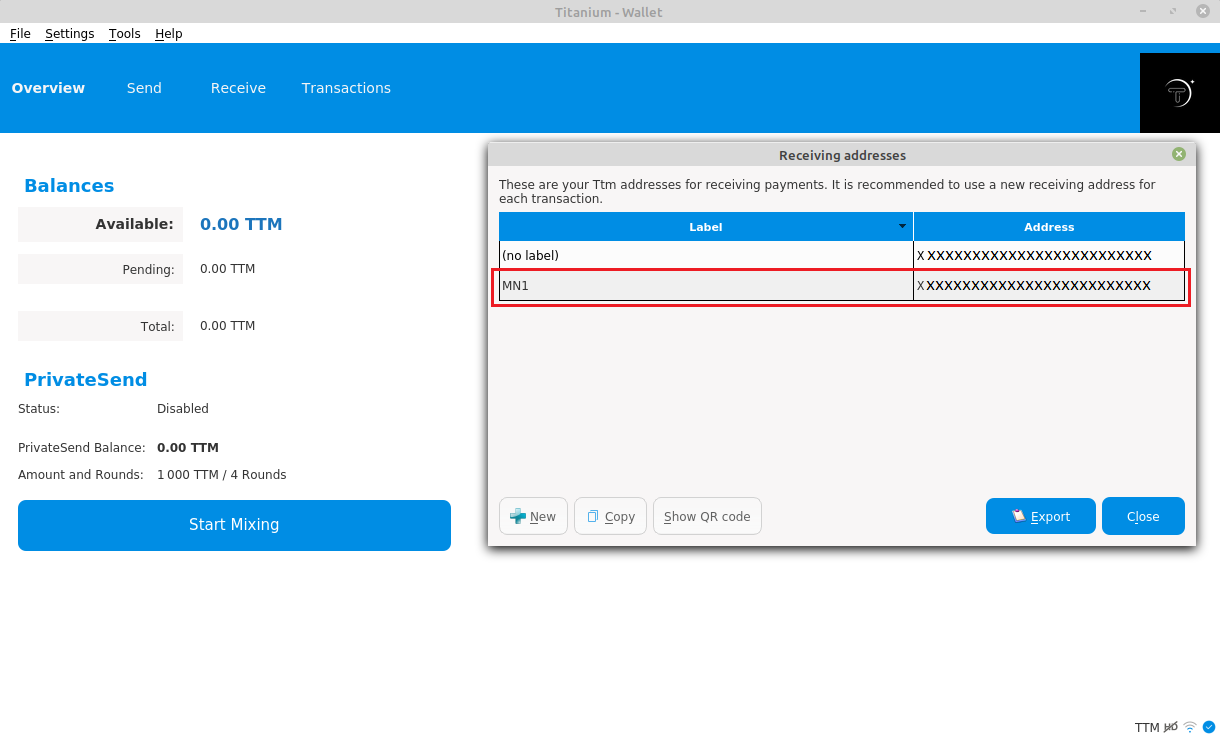
2. Create addresses by clicking New and specifying address label. In our case we used name as follows:
- – MN1 (for collateral)
- – MN1_OwnerKey
- – MN1_Payout
- – MN1_VotingKey
In the end we have all four addresses ready:
3. Backup your wallet
4. Send collateral - 30000 TTM - to your collateral address. In our case - MN1.
5. Send 5TTM to your Payout address in our case MN1_Payout. (This address is used for MN fees so small balance is needed)
6. Wait for 15 block confirmations.
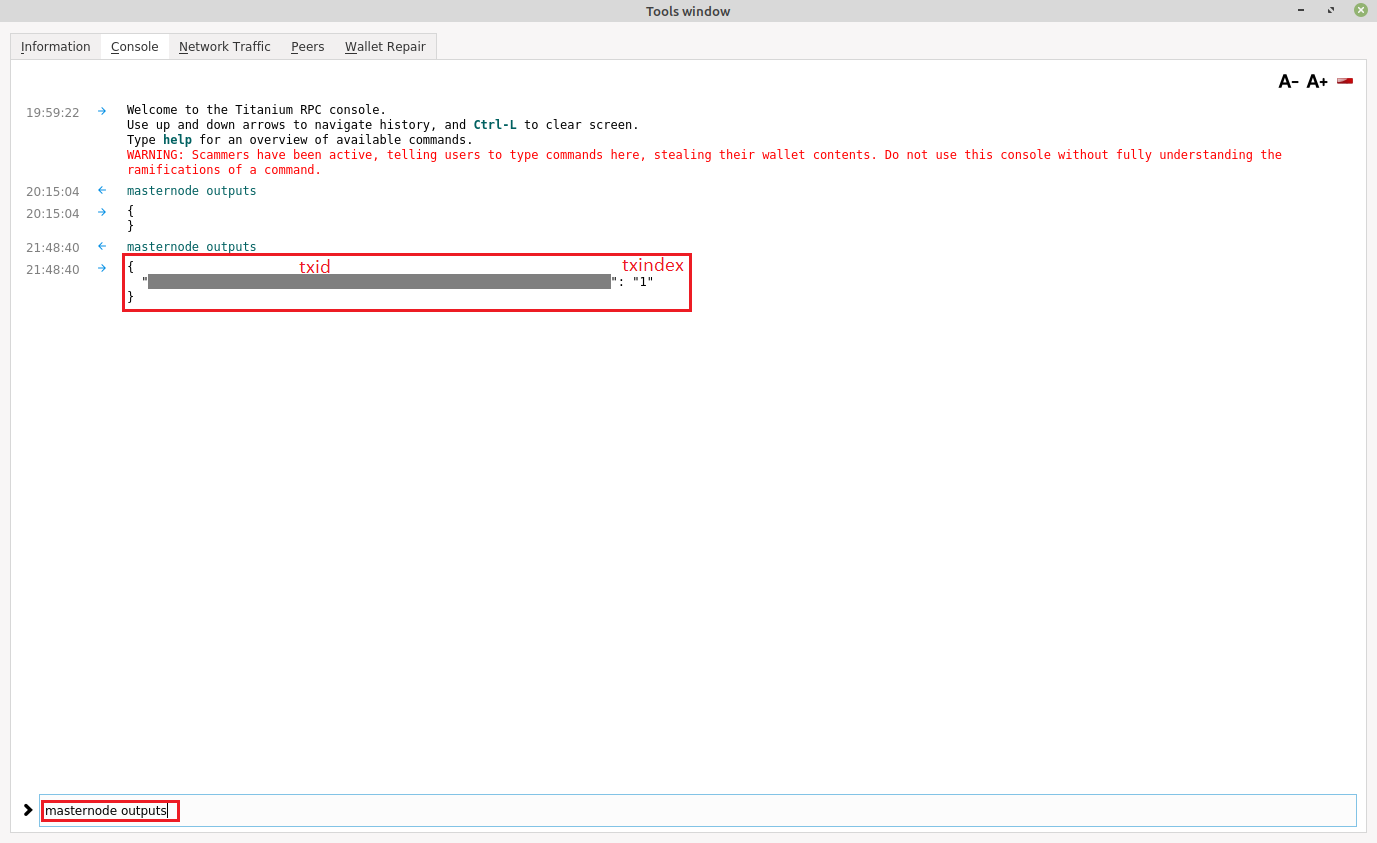
7. Check that you got masternode output and note down txid and txindex.
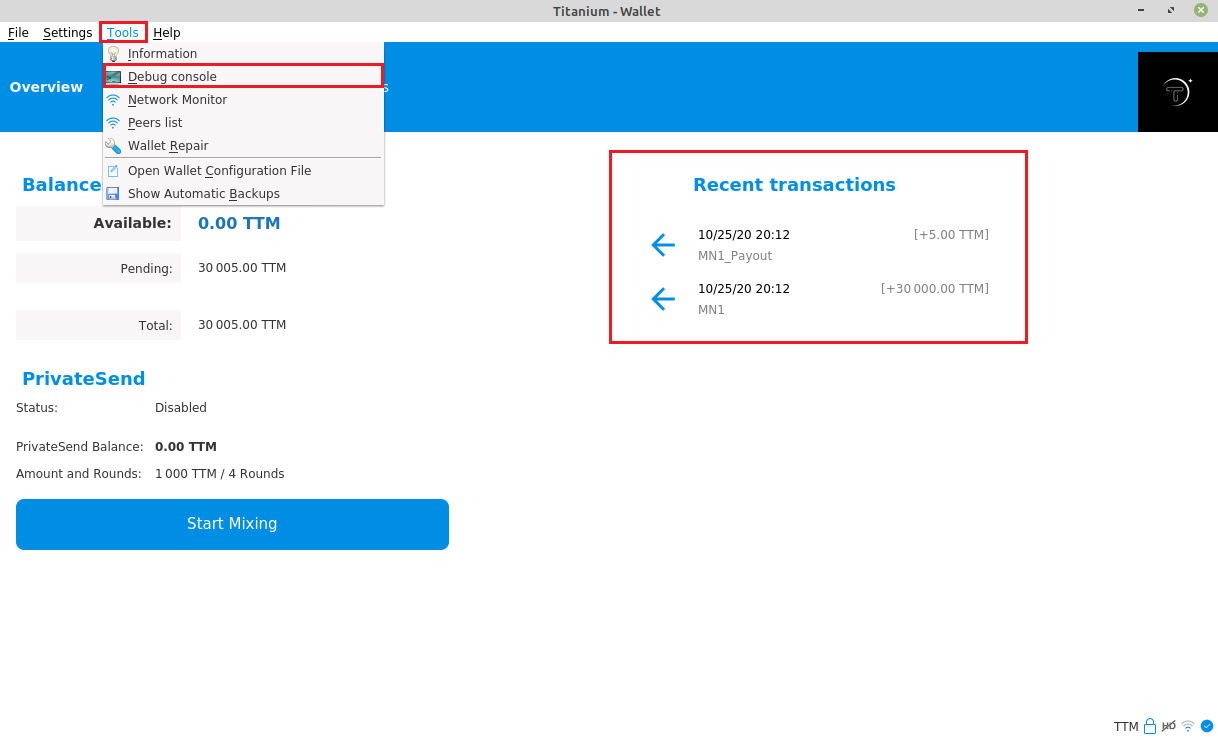
- Open Tools -> Debug console
- Type in masternode outputs and hit enter. TxIndex can be either "0" or "1"
- Note down txid and txindex (use notepad or any other text editor of your choice).
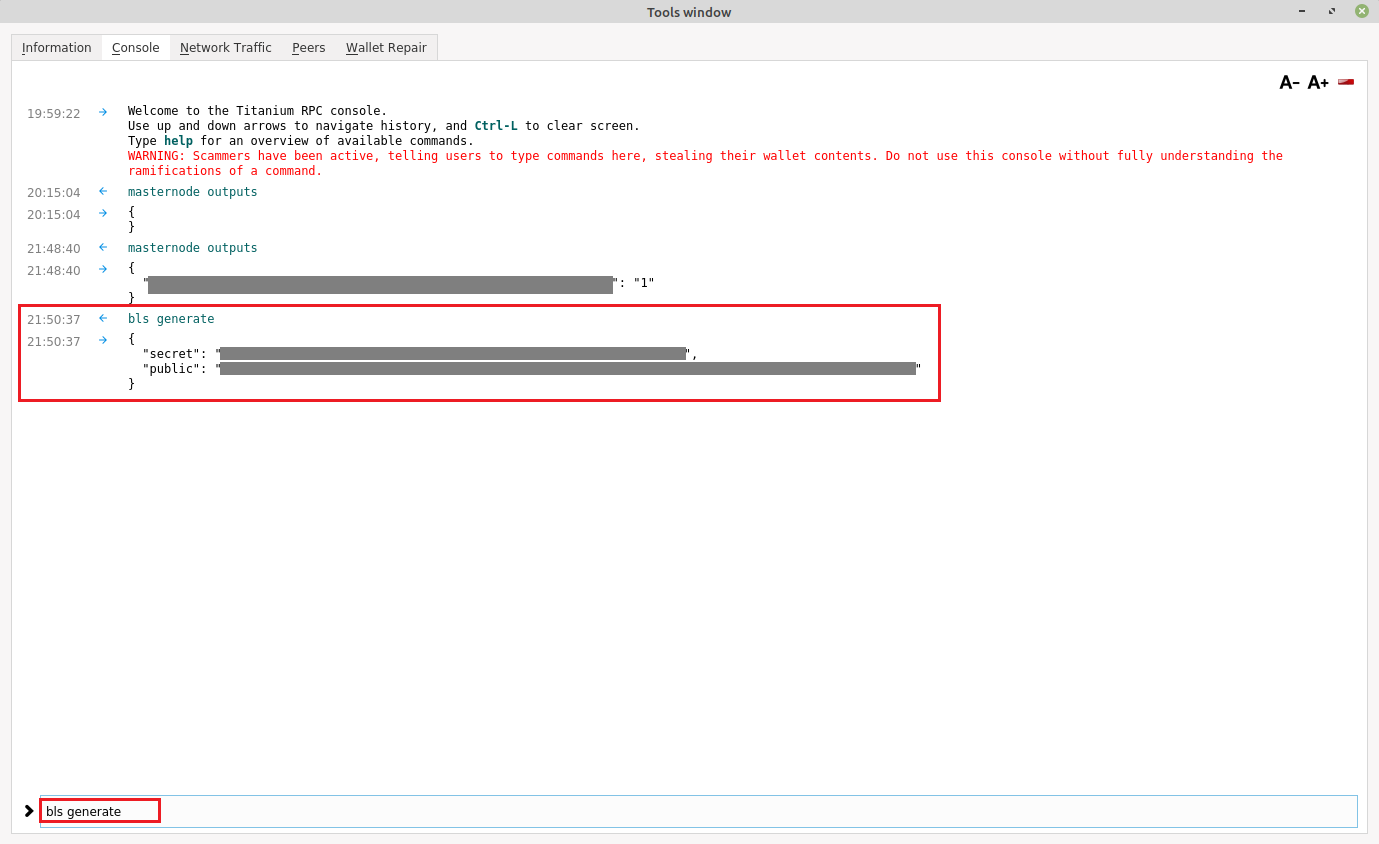
8. Create bls key
- Open debug console (or continue in already open one).
- Type in bls generate and hit enter.
- Note down your secret and your public key.
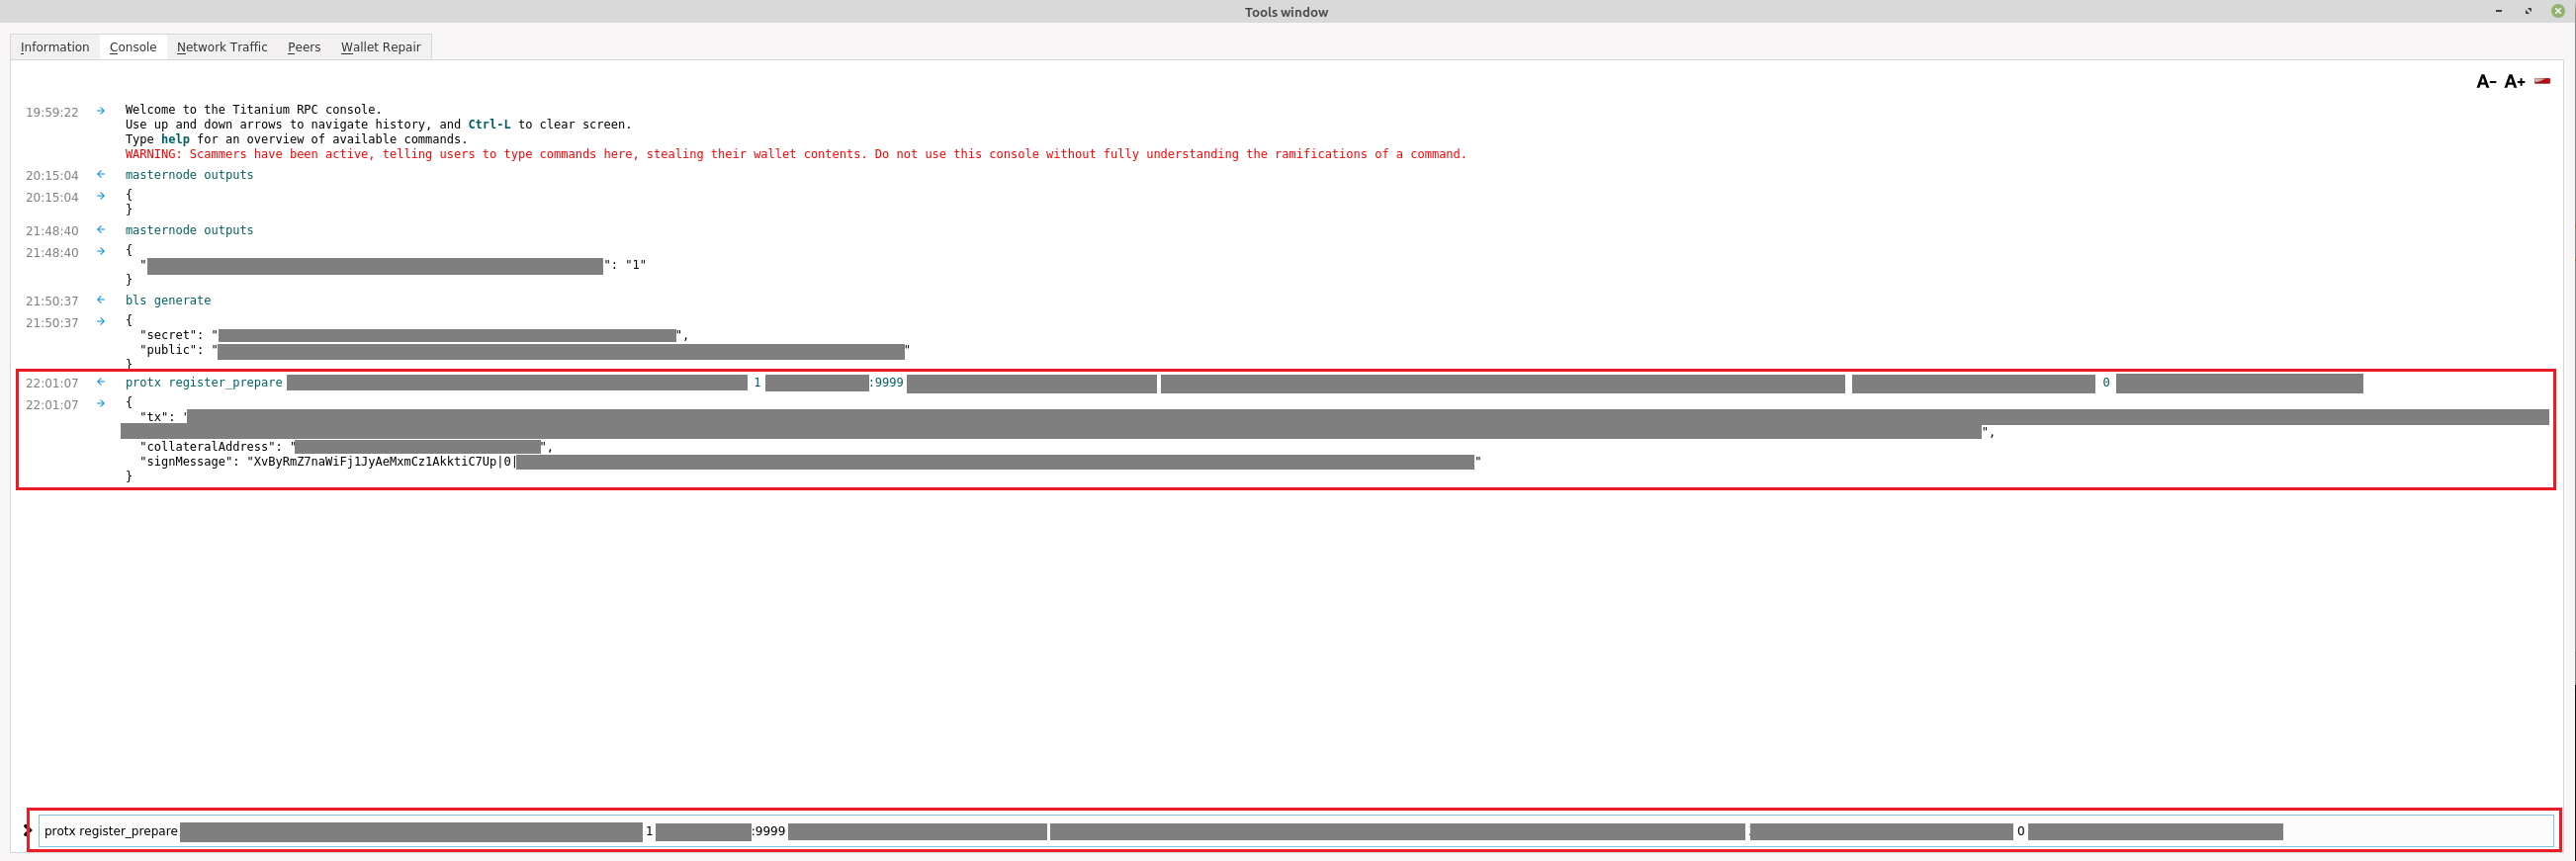
9. Prepare MN registration (ProRegTx transaction)
- Type in command in following format. Replace values with the corresponding values (see legend below):
protx register_prepare collateralHash collateralIndex ipAndPort ownerKeyAddr operatorPubKey votingKeyAddr 0 payoutAddress
Legend:
- collateralHash: The txid of the collateral funding transaction (see step 7).
- collateralIndex: The output index of the funding transaction (see step 7).
- ipAndPort: Masternode IP address and port, in the format x.x.x.x:9999 (the IP corresponds to the IP of your VPS, see next section)
- ownerKeyAddr: Ownerkey address you created in step 2
- operatorPubKey: The BLS public key generated above (see step 8)
- votingKeyAddr: VotingKey address you created in step 2
- 0: Leave as "0".
- payoutAddress: Payout address you created in step 2
- Note down the result.
VPS configuration (VPS side)
You are basically free to choose whatever server you wish. We do recommend you to rent a VPS - such as the cheapest from www.contabo.com - since the server needs to be online 100% to generate revenue. As operating system we suggest you to select Ubuntu 18.04.
To interact with the server, you can use a SSH client such as "Putty" (https://www.putty.org).
We assume creation of masternode named ttm1, you can use any name of your choice but do NOT forget to use correct name in all steps bellow.
10. Log in to your VPS through SSH.
11. Make sure you are logged as root (if not, type su root or sudo -i)
12. Update all packages on your VPS: apt update && apt upgrade -y
13. Create directory for your masternode: mkdir -p /mns/ttm1
14. Get to newly created directory: cd /mns/ttm1
15. Download archive containing masternode binaries:
wget https://github.com/mytitanium/Titanium-Core-1.5/releases/download/1.5/Linux.rar
16. Extract downloaded archive: unzip Linux.rar
If you get an error, you need to instal a unzipper: sudo apt install zip unzip
17. Move content of extracted archive to current directory: mv Linux/* .
(dont forget to copy the "." along)
18. (Optional) Cleanup archive and empty LIN directory: rm -r Linux and rm Linux.rar
19. Set correct file permissions: chmod +x bin/ttmd bin/ttm-cli
20. Create data directory (directory where your masternode stores blockchain): mkdir data
21. Create configuration file
- Type: nano data/ttm.conf
- Write or paste the following configuration and replace “MASTERNODE_KEY” with the secret key obtained in step 8 (Create bls key) and “IP” with your VPS public IP.
                        listen=1

                        server=1

                        masternodeblsprivkey=MASTERNODE_KEY

                        externalip=IP
22. Create a user for your masternode: useradd ttm1 -m -s /bin/sh
23. Give access permissions for newly created user: chown -R ttm1:ttm1 bin/ , then chown -R ttm1:ttm1 data/
24. Create a service file - this ensures your masternode starts automatically after VPS reboot.
- Type nano ttm1.service
- Paste or type following configuration
                        [Unit]

                        Description=ttm1 service

                        After=network.target


                        [Service]

                        User=ttm1

                        Group=ttm1

                        Type=simple

                        Restart=always

                        ExecStart=/mns/ttm1/bin/ttmd -datadir=/mns/ttm1/data/

                        TimeoutStopSec=90

                        [Install]

                        WantedBy=default.target
25. Install systemctl service: cp ttm1.service /etc/systemd/system/ttm1.service then systemctl daemon-reload
26. Enable the newly installed service: systemctl enable ttm1
27. Start your masternode: systemctl start ttm1
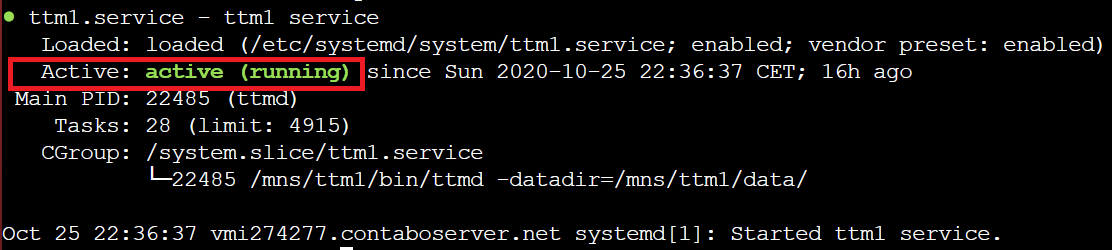
28. Check if your masternode is running correctly: systemctl status ttm1
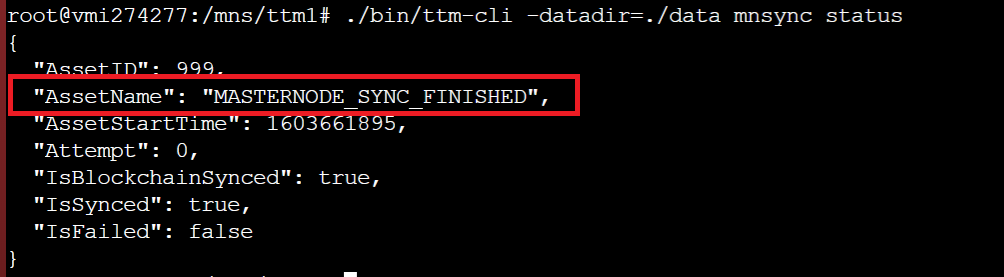
WAIT for the masternode synchronization -- you can check it by typing: ./bin/ttm-cli -datadir=./data mnsync status.
Masternode activation (Wallet side)
30. Return to debug console of QT wallet.
31. Sign ProRegTx transaction:
- Type in debug console the following command and replace the values according to the following legend: signmessage collateralAddress signMessage Legend:
- signmessage: command, leave like that.
- collateralAddress: Address generated in step 2, labeled as MN1.
- signMessage: Replace with result from step 9, designated as “signMessage”, last line in the picture.
Use the whole line, including what is beyond the |0|!
Example:
XvByRmZ7naWiFjlJyAeMxmCzlAkktiC7up|0|II8JvEBMj6I3Ws8wqxh0bXVds6Ny+7h5HAQhqmd5r/0lWBCpsxMJHJT3KBcZ23oUZtsa6gjgISf+a8GzJg1BfEg=
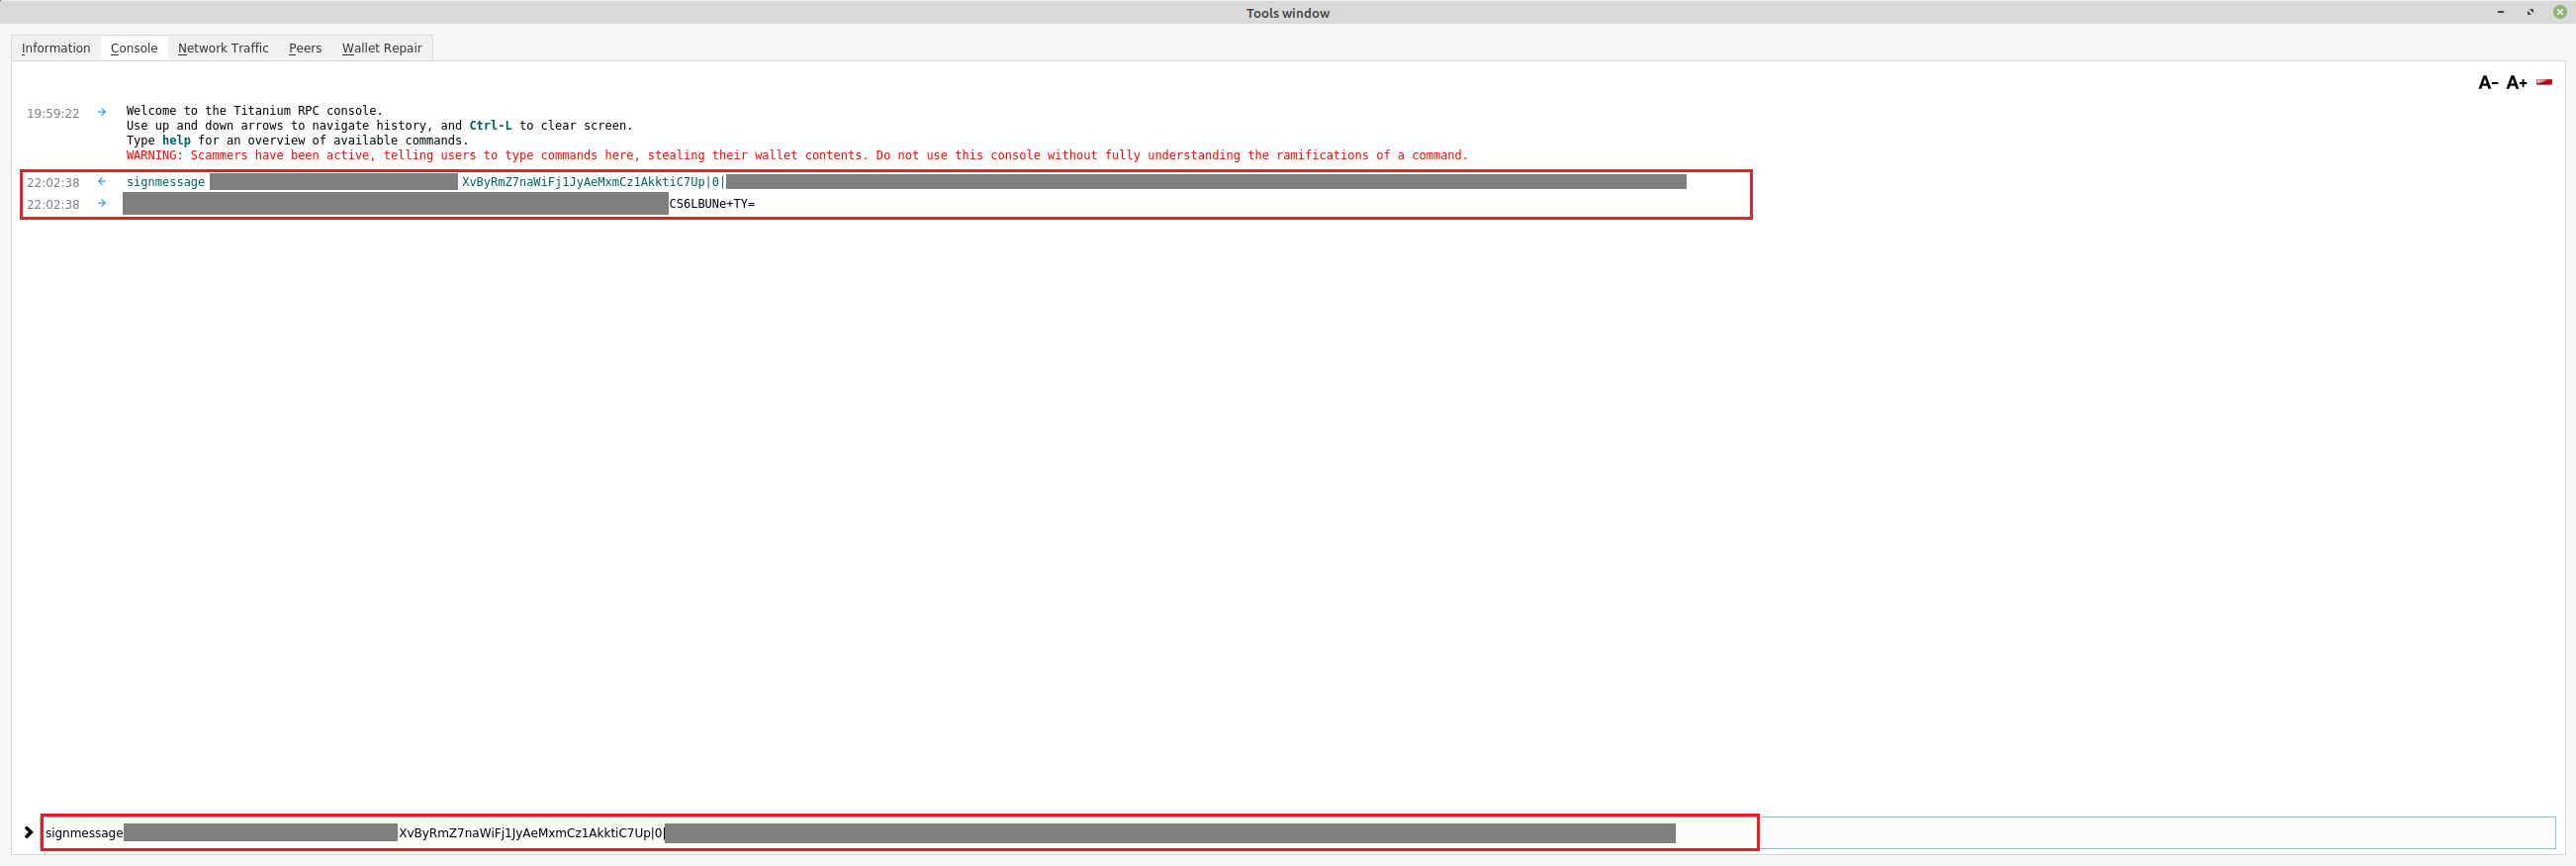
32. Submit ProRegTx transaction:
- Type the following command in the debug console and replace according to the legend: protx register_submit tx sig Legend:
- protx: command, leave like that.
- register_submit: command, leave like that
- tx: Generated in step 9 (fourth lane from the bottom on the corresponding image).
- sig: Generated in step 31 (first line after WARNING: Scammers have been active,… in the picture above)
Verify masternode status (VPS side)
1. Log onto your VPS server
2. Get to your masternode directory (ignore this if you are already there): cd /mns/ttm1
3. Run: ./bin/ttm-cli -datadir=./data masternode status

4. If your status says READY you just successfully started your masternode. Congratulations!